Cadet I/Minimap: Difference between revisions
(basic copy paste) |
No edit summary |
||
| (23 intermediate revisions by 7 users not shown) | |||
| Line 1: | Line 1: | ||
__NOTOC__ | __NOTOC__ | ||
<noinclude>{{:Cadet I/Week 1}} | |||
{{:Cadet 1 | {{Nav|Remapping controls|Minimap icons}}</noinclude> | ||
{{Nav|Remapping controls|Minimap icons}} | {{Title|The Minimap}} | ||
===[http://www.youtube.com/watch?v=APiUpVWg7hU A video demonstrating everything in this article is available HERE]=== | |||
'''Watch this video, it covers everything on this page with in-game examples. If you watch the video, you probably don't need to read the rest of this page.''' | |||
First and foremost, you must be aware that the minimap and any other system that gives you information can only give you information about '''what your team has detected'''. Undetected bases and ships do not appear on the map, nor on your command view nor on your HUD. However, as soon as you or any other sensor detects anything, the whole team receives the information. | |||
The minimap itself displays the whole map on which sectors are represented by circles and the [[aleph]]s that connect them as lines between the sectors. Most maps are, like this one, designed so that they look geometrically simple. You could have the same map with the same sectors connected in the same fashion, but rearranged to be displayed in a very complex fashion. | |||
===The Basics=== | |||
{{center|[[Image:Minimap0.png|The minimap]]}} | |||
The Minimap displays a lot of information in a very small space. Its main components are: | |||
#Ship and station icons. | |||
#Asteroid information. | |||
#The main map. | |||
By default the minimap displays information about the sector you are currently in, but you can get info about other sectors by hovering the mouse over the sector on the main map. The information displayed in the minimap is dependant on your team's sensors and probes, if something is not eyed then it will not appear on the minimap. Stations, once eyed, will stay on the minimap until they are destroyed. Enemy ships only appear when they are eyed and will disappear from the minimap as soon as they are no longer eyed. | |||
===Ship and Station icons=== | |||
In order to use the minimap effectively you must know what each icon on the minimap represents. The icons that will be most important to most pilots are the ship and station icons. These are learned easily and are explained in the next lesson. They are always displayed in the order: | |||
:Enemy ships, friendly ships, enemy bases, friendly bases. | |||
{{Note|In busy sectors there may be too many icons to fit on the minimap, in which case icons will "disappear" off the right.}} | |||
===Asteroids=== | |||
You can extend the minimap by clicking on the arrow to the side. Once expanded it shows information about the special asteroids in the sector - the number of He<sup>3</sup> rocks and remaining units of He<sup>3</sup>, and the number and type of any technology rock (Carbon, Uranium and Silicon). This is useful for seeing which sectors haven't been explored, or where the enemy built a techbase. | |||
{{Tip|Most veteran players expand the minimap as soon as they start playing because it has the side effect that more ship icons are displayed}} | |||
Information about Helium asteroids is given in two places. | |||
#Listed as He3 followed by a number, and is at the very top above the asteroids in the sector. As you may notice, this is often a large number and is not the number of Helium Asteroids in the sector. This is the number of units of Helium that can be mined from the sector. Keep in mind that each unit of Helium is usually worth about $80 and that miners can usually carry 90 units of Helium per load, making a fully loaded miner bring in about $7200. | |||
#At the bottom of the asteroids list, below any tech rocks. The number beside this icon is the number of helium rocks in the sector, represented by the white asteroid icon: [[Image:helium_icon.png]].<br>In the example above there are 4 helium asteroids with a total of 198 He<sup>3</sup> units between them. | |||
Tech rocks are the asteroids that Techbases can be built on. There are three types, Uranium, Silicon, and Carbon. In most cases there is normally only one tech rock per sector, and it is even more uncommon for there to be more than one of the same type, the number of each rock is given next to its icon. | |||
:* [[Image:uranium_icon.png]]. '''Uranium''' asteroid. An '''Expansion Complex''' requires this type. | |||
:* [[Image:carbon_icon.png]]. '''Carbon''' asteroid. A '''Supremacy Center''' requires this type. | |||
:* [[Image:silicon_icon.png]]. '''Silicon''' asteroid . A '''Tactical Laboratory''' requires this type. | |||
{{Note|Some techbases can build on any kind of tech asteroids, whilst others build on generic asteroids.}} | |||
===Main map=== | |||
The color of a sector on the minimap indicates which team holds it. A sector that is yellow is a sector controlled by the yellow team, a sector that is blue is controlled by the blue team. A sector that is shown as empty is usually one that is not directly controlled by any team, but could also be a sector controlled by an enemy team's base that you haven't spotted yet. Occasionally bases from multiple teams will be in the same sector. In this case, the sector has one team's color surrounded by a ring of the other team's color. | |||
When you | When you find an aleph to a new sector it will immediately appear on the minimap. If you are in a scout, it is useful to select this sector to autopilot to so your team can gain information about the tech rocks etc. that are within it. | ||
===Describing positions on the minimap=== | |||
[[Image:Minimap_naming.png|thumb|right|Sector names for HiHigher, one of the more commonly played maps.]] | |||
Map layouts are always the same and geometrically simple, but the sector names often change as the server randomly generates the map. Rather than learn which sector is which each game veteran players name sectors in reference to where they lie on the minimap. While not every map is as straightforward to label as the one pictured to the right, liberal application of "common sense" should sort it out. | |||
{{ | *Home {{-}} Always refers to the sector which your Garrison occupies. Most of the time this means the player is referring to your starting sector. | ||
*High {{-}} Sectors at the top of the minimap. | |||
*Midhigh {{-}} Sectors between the high ones and the centre ones. | |||
*Centre {{-}} Sectors in the centre. | |||
*Midlow {{-}} You probably get the idea... | |||
{{Clear}} | |||
===Sector indicators=== | |||
There are several important indicators that appear around or near sectors in the minimap. These let you know things such as where you are and where you clicked last on the minimap. | |||
:{| class="wikitable" | |||
! Indicator !! Explanation | |||
|- | |||
| align=center | [[Image:self_icon.png]] || Current location. | |||
|- | |||
| align=center | [[Image:focus_icon.png]]|| Sector you are currently focusing on. | |||
|- | |||
| align=center | [[Image:lastclick_icon.png]] || Sector containing your current waypoint. | |||
|- | |||
| align=center | [[Image:buildable_icon.png]] || Selected constructor can build in this sector. | |||
|- | |||
| align=center | [[Image:ripstation_icon.png]] || Teleport receiver available. These indicators only appear when you engage ripcord. | |||
|- | |||
| align=center | [[Image:ripping_icon.gif]]||The sector you are ripcording to. | |||
|- | |||
| align=center | [[Image:level1_icon.png]] || Enemy ship detected. | |||
|- | |||
| align=center | [[Image:level2_icon.png]] || Base killing/capturing ship detected in a sector you do not own. | |||
|- | |||
| align=center | [[Image:level3_icon.png]] || Station at risk: base killing/capturing ship detected in a sector you do own. | |||
|} | |||
Additionally, beside each sector a number of colored squares will be shown, indicating the number of ships of each team in the sector. Like the sectors themselves, the color of the squares represent the team the ships belong to. While each square does not represent one ship, they do allow for the strength of each team to be estimated. | |||
===Piloting with the minimap=== | |||
As covered previously, left-clicking on any sector in the minimap will give yourself a waypoint there and engage your autopilot to take you to that sector. If there is a teleport receiver available in or closer to that sector, your autopilot will ripcord you there first. Ripcording will be covered in more depth in a later lesson. | |||
Right-clicking on any sector will open a chatbox with that sector as the target. | |||
===Examples=== | |||
{{Example|[[File:Minimap.jpg|Minimap example 1 - simple|center]] | |||
*In this image the player is looking at the sector Claytow midlow left, which has one friendly and one enemy [[scout]], 2 friendly [[miner]]s, a friendly [[refinery]], a silicon rock and 2 helium rocks (264 He). | |||
*Midlow centre we can see a warning flash so obviously the blue base is in trouble there. | |||
*Judging by the number of blue dots midlow centre most of blue team is there, defending. | |||
*There is some conflict happening centre. | |||
*On the left both teams have built a base.}} | |||
{{Example|[[File:Minimapbuild.jpg|Minimap example 2 - building|center]] | |||
*In this example the map is not fully explored. | |||
*The player is looking at Oblivion which is midhigh centre, and is full of techrocks, miners, and [[constructor]]s. | |||
*The player has selected one of the constructors, and little red triangles have appeared on the minimap indicating where it could build.}} | |||
{{Example|[[File:Minimapripcord.jpg|Minimap example 3 - ripcording|center]] | |||
*In this example the map is not fully explored. | |||
*The player is looking at Lemminaken which is midlow right, and is full of techrocks, himself flying a [[stealth fighter]], and a [[teleport receiver]]. | |||
*He has set himself a waypoint midhigh centre, as indicated by the green triangle. | |||
*He is currently ripcording, and the red diamonds indicate where teleport receivers exist. | |||
*The brighter one midhigh centre is the one he is ripcording to.}} | |||
{{Example|[[Image:Minimap.png|Minimap example 4 - complex|center]] | |||
*'''A''' {{-}} Ship and station icons. At the moment your team can see (from left to right): | |||
**6 blue eject pods, 5 advanced fighters with [[nan]] capability (denoted by the small 'N' to the top right of the icon), 3 yellow scouts with nan capability, 2 yellow PT bombers, 8 yellow Heavy interceptors, a yellow Heavy Troop Transport with armour plating, a blue refinery, and a blue teleport receiver. | |||
*'''B''' {{-}} The sector name, Torc. | |||
*'''C''' {{-}} The amount of He<sup>3</sup>, 78. | |||
*'''D''' {{-}} The type and number of asteroids. There are 4 He rocks and 0 tech rocks. | |||
*'''E''' {{-}} A sector controlled by yellow with one blue dot and one yellow dot, and the 'Enemy ship detected' indicator. | |||
*'''F''' {{-}} A sector controlled by blue with several dots of each colour, the 'Enemy base killing/capturing ship detected' indicator, and the yellow 'You are here' icon. | |||
Yellow has PT bombers, which are [[GT]]-only, and armour-plated HTTs: to obtain these ships, yellow must have (or had) a Palisade, a Research station and an Expansion Complex. Blue has advanced fighters with the ability to mount nanite guns - those are exclusive to Belter's Supremacy. | |||
The presence of the troop transport is somewhat baffling -- it cannot capture the teleport nor the refinery that blue have in Torc, so its presence there poses only a marginal threat. | |||
We can hazard a number of educated guesses with regards to the situation: | |||
* You are yellow team | |||
* The HTT is rolling to middle, or | |||
* The blue base the HTT is attempting to cap isn't listed because the minimap isn't infinitely wide, or | |||
* Yellow captured a base in Torc, blue recapped it successfully, yellow sent its own recap HTT out - but the base has been destroyed in the meantime by the bombers. | |||
* The blue base that was (or is) in Torc was a tech-base because the '''D''' portion of the minimap shows there is no tech rock. | |||
With an educated guess we can surmise that: | |||
* E is only marginally active. Your team might have a couple miners there. | |||
* The activity in your home sector (far right) might suggest a few cons just launched. | |||
* Torc is approximately one miner load from being mined out ('''D'''), so if you were to go miner hunting you should search for sectors richer in He3 first. Miners generally try to avoid sectors where an all-out confrontation is taking place. | |||
The minimap has told us which faction you are, where you are, which techpath the enemy chose, what is happening in Torc, a great deal about spotted ships in other sectors, and some more to boot - all packed in to a tiny window. | |||
This should be compelling proof of the importance of the minimap. It is the number one aid to improving situational awareness. | |||
}} | |||
<noinclude>{{Nav2|Remapping controls|Minimap icons}}</noinclude> | |||
Latest revision as of 15:59, 14 March 2011
| ← Remapping controls | Minimap icons → |
The Minimap
A video demonstrating everything in this article is available HERE
Watch this video, it covers everything on this page with in-game examples. If you watch the video, you probably don't need to read the rest of this page.
First and foremost, you must be aware that the minimap and any other system that gives you information can only give you information about what your team has detected. Undetected bases and ships do not appear on the map, nor on your command view nor on your HUD. However, as soon as you or any other sensor detects anything, the whole team receives the information.
The minimap itself displays the whole map on which sectors are represented by circles and the alephs that connect them as lines between the sectors. Most maps are, like this one, designed so that they look geometrically simple. You could have the same map with the same sectors connected in the same fashion, but rearranged to be displayed in a very complex fashion.
The Basics

|
The Minimap displays a lot of information in a very small space. Its main components are:
- Ship and station icons.
- Asteroid information.
- The main map.
By default the minimap displays information about the sector you are currently in, but you can get info about other sectors by hovering the mouse over the sector on the main map. The information displayed in the minimap is dependant on your team's sensors and probes, if something is not eyed then it will not appear on the minimap. Stations, once eyed, will stay on the minimap until they are destroyed. Enemy ships only appear when they are eyed and will disappear from the minimap as soon as they are no longer eyed.
Ship and Station icons
In order to use the minimap effectively you must know what each icon on the minimap represents. The icons that will be most important to most pilots are the ship and station icons. These are learned easily and are explained in the next lesson. They are always displayed in the order:
- Enemy ships, friendly ships, enemy bases, friendly bases.

Note In busy sectors there may be too many icons to fit on the minimap, in which case icons will "disappear" off the right.
Asteroids
You can extend the minimap by clicking on the arrow to the side. Once expanded it shows information about the special asteroids in the sector - the number of He3 rocks and remaining units of He3, and the number and type of any technology rock (Carbon, Uranium and Silicon). This is useful for seeing which sectors haven't been explored, or where the enemy built a techbase.

Tip: Most veteran players expand the minimap as soon as they start playing because it has the side effect that more ship icons are displayed
Information about Helium asteroids is given in two places.
- Listed as He3 followed by a number, and is at the very top above the asteroids in the sector. As you may notice, this is often a large number and is not the number of Helium Asteroids in the sector. This is the number of units of Helium that can be mined from the sector. Keep in mind that each unit of Helium is usually worth about $80 and that miners can usually carry 90 units of Helium per load, making a fully loaded miner bring in about $7200.
- At the bottom of the asteroids list, below any tech rocks. The number beside this icon is the number of helium rocks in the sector, represented by the white asteroid icon:
 .
.
In the example above there are 4 helium asteroids with a total of 198 He3 units between them.
Tech rocks are the asteroids that Techbases can be built on. There are three types, Uranium, Silicon, and Carbon. In most cases there is normally only one tech rock per sector, and it is even more uncommon for there to be more than one of the same type, the number of each rock is given next to its icon.
 . Uranium asteroid. An Expansion Complex requires this type.
 . Carbon asteroid. A Supremacy Center requires this type.
 . Silicon asteroid . A Tactical Laboratory requires this type.
Note Some techbases can build on any kind of tech asteroids, whilst others build on generic asteroids.
Main map
The color of a sector on the minimap indicates which team holds it. A sector that is yellow is a sector controlled by the yellow team, a sector that is blue is controlled by the blue team. A sector that is shown as empty is usually one that is not directly controlled by any team, but could also be a sector controlled by an enemy team's base that you haven't spotted yet. Occasionally bases from multiple teams will be in the same sector. In this case, the sector has one team's color surrounded by a ring of the other team's color.
When you find an aleph to a new sector it will immediately appear on the minimap. If you are in a scout, it is useful to select this sector to autopilot to so your team can gain information about the tech rocks etc. that are within it.
Describing positions on the minimap

Map layouts are always the same and geometrically simple, but the sector names often change as the server randomly generates the map. Rather than learn which sector is which each game veteran players name sectors in reference to where they lie on the minimap. While not every map is as straightforward to label as the one pictured to the right, liberal application of "common sense" should sort it out.
- Home · Always refers to the sector which your Garrison occupies. Most of the time this means the player is referring to your starting sector.
- High · Sectors at the top of the minimap.
- Midhigh · Sectors between the high ones and the centre ones.
- Centre · Sectors in the centre.
- Midlow · You probably get the idea...
Sector indicators
There are several important indicators that appear around or near sectors in the minimap. These let you know things such as where you are and where you clicked last on the minimap.
Indicator Explanation 
Current location. 
Sector you are currently focusing on. 
Sector containing your current waypoint. 
Selected constructor can build in this sector. 
Teleport receiver available. These indicators only appear when you engage ripcord. 
The sector you are ripcording to. 
Enemy ship detected. 
Base killing/capturing ship detected in a sector you do not own. 
Station at risk: base killing/capturing ship detected in a sector you do own.
Additionally, beside each sector a number of colored squares will be shown, indicating the number of ships of each team in the sector. Like the sectors themselves, the color of the squares represent the team the ships belong to. While each square does not represent one ship, they do allow for the strength of each team to be estimated.
Piloting with the minimap
As covered previously, left-clicking on any sector in the minimap will give yourself a waypoint there and engage your autopilot to take you to that sector. If there is a teleport receiver available in or closer to that sector, your autopilot will ripcord you there first. Ripcording will be covered in more depth in a later lesson.
Right-clicking on any sector will open a chatbox with that sector as the target.
Examples

Example 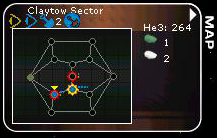
- In this image the player is looking at the sector Claytow midlow left, which has one friendly and one enemy scout, 2 friendly miners, a friendly refinery, a silicon rock and 2 helium rocks (264 He).
- Midlow centre we can see a warning flash so obviously the blue base is in trouble there.
- Judging by the number of blue dots midlow centre most of blue team is there, defending.
- There is some conflict happening centre.
- On the left both teams have built a base.

Example 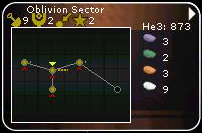
- In this example the map is not fully explored.
- The player is looking at Oblivion which is midhigh centre, and is full of techrocks, miners, and constructors.
- The player has selected one of the constructors, and little red triangles have appeared on the minimap indicating where it could build.

Example 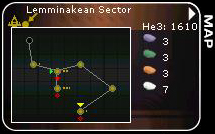
- In this example the map is not fully explored.
- The player is looking at Lemminaken which is midlow right, and is full of techrocks, himself flying a stealth fighter, and a teleport receiver.
- He has set himself a waypoint midhigh centre, as indicated by the green triangle.
- He is currently ripcording, and the red diamonds indicate where teleport receivers exist.
- The brighter one midhigh centre is the one he is ripcording to.

Example 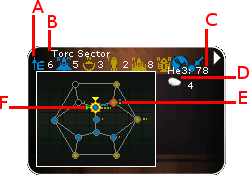
- A · Ship and station icons. At the moment your team can see (from left to right):
- 6 blue eject pods, 5 advanced fighters with nan capability (denoted by the small 'N' to the top right of the icon), 3 yellow scouts with nan capability, 2 yellow PT bombers, 8 yellow Heavy interceptors, a yellow Heavy Troop Transport with armour plating, a blue refinery, and a blue teleport receiver.
- B · The sector name, Torc.
- C · The amount of He3, 78.
- D · The type and number of asteroids. There are 4 He rocks and 0 tech rocks.
- E · A sector controlled by yellow with one blue dot and one yellow dot, and the 'Enemy ship detected' indicator.
- F · A sector controlled by blue with several dots of each colour, the 'Enemy base killing/capturing ship detected' indicator, and the yellow 'You are here' icon.
Yellow has PT bombers, which are GT-only, and armour-plated HTTs: to obtain these ships, yellow must have (or had) a Palisade, a Research station and an Expansion Complex. Blue has advanced fighters with the ability to mount nanite guns - those are exclusive to Belter's Supremacy.
The presence of the troop transport is somewhat baffling -- it cannot capture the teleport nor the refinery that blue have in Torc, so its presence there poses only a marginal threat.
We can hazard a number of educated guesses with regards to the situation:- You are yellow team
- The HTT is rolling to middle, or
- The blue base the HTT is attempting to cap isn't listed because the minimap isn't infinitely wide, or
- Yellow captured a base in Torc, blue recapped it successfully, yellow sent its own recap HTT out - but the base has been destroyed in the meantime by the bombers.
- The blue base that was (or is) in Torc was a tech-base because the D portion of the minimap shows there is no tech rock.
With an educated guess we can surmise that:
- E is only marginally active. Your team might have a couple miners there.
- The activity in your home sector (far right) might suggest a few cons just launched.
- Torc is approximately one miner load from being mined out (D), so if you were to go miner hunting you should search for sectors richer in He3 first. Miners generally try to avoid sectors where an all-out confrontation is taking place.
The minimap has told us which faction you are, where you are, which techpath the enemy chose, what is happening in Torc, a great deal about spotted ships in other sectors, and some more to boot - all packed in to a tiny window.
This should be compelling proof of the importance of the minimap. It is the number one aid to improving situational awareness.
- A · Ship and station icons. At the moment your team can see (from left to right):

| ← Remapping controls | Minimap icons → |