Cadet I/Targeting and Autopilot: Difference between revisions
m (→Summary of clicking: changed title) |
m (template linked to AFS targeting lesson, so there is not duplicate material) |
||
| (One intermediate revision by the same user not shown) | |||
| Line 2: | Line 2: | ||
{{:Cadet I/Week 2}} | {{:Cadet I/Week 2}} | ||
{{Nav|Week One review|Pods and Killbonus}} | {{Nav|Week One review|Pods and Killbonus}} | ||
{{:AFS/Targeting}} | |||
{{clear}} | {{clear}} | ||
{{:AFS/Autopilot}} | |||
{{Nav2|Week One review|Pods and Killbonus}} | {{Nav2|Week One review|Pods and Killbonus}} | ||
Latest revision as of 03:50, 9 October 2010
| ← Week One review | Pods and Killbonus → |
Targeting and Autopilot
There are many keys used to target all kinds of objects. As covered in the tutorial, by default the common targeting keys are:
- x will target the closest enemy
- e will target every enemy one after the other
- b will target the closest docking base
- q will target enemy bases
- c will target whatever is in the center of your screen
- j will target friendly eject pods
There are plenty of target functions that you may want to consider binding, such as enemy bomber, enemy miner, friendly constructor, there's even a target aleph!
Make sure you know how to target real well. Quickly targeting what you want will prove to be an excellent asset in both fighting and being a good teammate.
Left-clicking on the minimap or right clicking an object will cause you to target whatever you clicked on. Right-clicking on empty space will set a waypoint at that point and target it. In either case your ship will also engage autopilot to your new target too.
Note Right-clicking on the minimap opens a chatbox with that sector as the recipient
Tracking your enemy
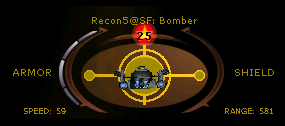
When you target something its icon will be highlighted on your HUD, but there is also more information at the bottom of your screen. Targeting your enemy will provide you with a lot of essential information.
- You have the name of the pilot and the ship they're flying.
- The amount of armour and shield they have currently.
- Their speed and distance from you.
- Most importantly, a picture of their ship orientation relative to you.
This is where you take decisions. Do you try to use your superior agility or superior firepower? This depends on whether you're a heavy interceptor against a scout, or the opposite. If you should flee or pursue, keeping track of their speed and distance should be useful. Knowing if you are in range or not also is an important asset (the green reticule on the top right indicates that the target is in range).
The ship displayed as your target is placed relative to your position. If the ship is looking at you, it will be looking at you in the target. If it is moving away from you, you will see the back of the ship. In short, you see the ship as if you were looking at it from a camera on your ship. Use this to know whether you're being pursued or not, or to place yourself on parallel flight paths, for example.
Tip: Veteran players will attempt to throw off their opponents view of them. For instance looking at you but flying backwards so that in the image it appears they're flying straight at you. Keep an eye on their speed and range to discover what they're up to.
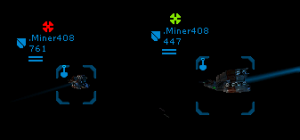
Additionally certain ships provide you with lead indicators, which indicate where your weapons must be fired in order to hit the target. With a target out of range, the lead indicator is red. When the target is in range, the lead indicator turns green: fire on it to hit the target. All turret guns have lead indicators. Also, if an assault ship or carrier is present in a sector, it provides all friendly ships with lead indicators.
Tip: Don't be distracted by the lead indicator. Continue to zoom in slightly and watch your bullets to ensure they're hitting your target.
Using the Autopilot (AP)
The autopilot can only control your thrusters and ripcord sequence, not your boosters. Pressing p will engage your autopilot. If you have no target then pressing p will stop your ship. Pressing p while having a target will direct your ship toward the target. Since the AP isn't that smart, this is mostly used in pod pickups. The pilot flys toward the pod, the pod activates his autopilot to fly in the right direction to get a pickup.
Tip: If both the pod and the ship pilots have their AP engaged then both ships will begin waving about as they try and compensate for the other's movement. If this happens turn off your AP and fly straight at your teammate - rely on him leaving his AP on.
The autopilot is mostly used in long distance flying. For example, when viewing your command view (the radar) right-clicking on the map (such as clicking in empty space) will engage your autopilot to go that way. This is widely used when scouting. Give yourself a waypoint toward where you think an aleph is, then click on the aleph when you discover it to go inside that aleph. Also useful in picking up floating items, simply right-click on them.
Left-clicking on the minimap will automatically engage your autopilot. If a teleport receiver is in the sector on which you clicked (or in a sector closer to the target than your current location) a ripcord sequence will start. If you need to get there the long way press r to disengage the ripcord and remain on AP.
Note The AP will always calculate and select the shortest route from your location to your destination, however it doesn't account for the distances between teleport receivers and alephs. A little bit of planning before you launch can save you a lot of time.
The AP does not consider enemy threats nor the fact that you may want to use alternate routes to remain undetected. Be sure to remain in control, using the AP only as a tool, not as a replacement pilot. The AP is also useful for quickly finding your target when you're disorientated. Simply engage it AP, note which way your ship begins to turn, then take over movement yourself.
Example If you're flying between sectors, you can left-click on the minimap 2 sectors away. As you enter the first sector, your ship will immediately orient itself toward the aleph leading to the next sector, saving you the few seconds during which you search your HUD for the aleph.
Example You're flying back to base and can't see the green door. Turn on AP and note which side of the base your ship is now facing. Head that way and start exploring. (Especially useful for Belters bases ;))
Disengaging the AP is a simple task. As the HUD icon states, "Press P to disengage". Or you can simply do anything (move the ship, fire a bullet, change the speed), and the AP will immediately disengage.
Recapping the mouse functions
Minimap:
- Left-clicking will engage AP to that sector. Upon flying through the last aleph your ship will stop.
- Right-clicking will open a chatbox with that sector as the recipient.
Cockpit:
- Left-clicking (or dragging a box) will select objects. You can then send them an order, a voice chat to them personally, or open a chatbox with them as the sole recipient.
- Right-clicking on anything will target it and engage your AP to it.
Command view:
- Left-clicking (or dragging a box) will select the object. You can then send them an order, a voice chat to them personally, or open a chatbox with them as the sole recipient.
- Right-clicking on anything will target it and (unless in base) engage your AP to it.
- Holding on right-click and dragging will allow you to set a waypoint above or below the plane.
| ← Week One review | Pods and Killbonus → |


