Cadet I/Terminals
| ← Hangar bay | Radar grid → |
"F" keys and Terminals
All of the following keys are toggles. Press the key once to open the corresponding view. Press the button again to leave it.
F1 - Help Menu (always available)
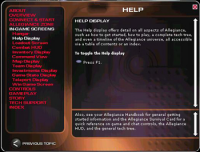
The F1 key help menu was completely rewritten in 2006, Led by AEM with assistance from Fell. It now holds an abundance of helpful material. You can access it immediately after Allegiance launches. You do not have to be in an actual game to review it.
Note The F1 content is based upon the old Academy crash course, a predecessor to the current Cadet I course.
F2 - Cockpit View/Hangar bay
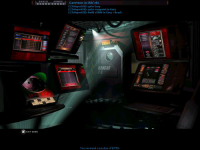
Whenever you leave your default view (by pressing another function key) this key will take you back to default screen -- the cockpit view, if you are flying, or the hangar bay, if you are docked. This comes handy when you are in a hurry.
F3 - Command View
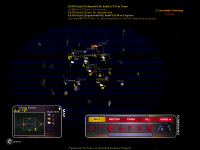
The command view, as implied by its name, is where Allegiance gets most of its RTS flavor. It is an efficient interface to the world for the commander, who can use it to issue orders to drones or team members. Only one sector can be viewed at a time, but if you are docked you can see any. Just click on the relevant sector in the minimap.
Normal pilots can make use of this view as well, and while in base they frequently use it to see where they are needed most, what the enemy are up to, or to plan their next course of action. The view gives them much more information about their environment than the cockpit can, and is also extremely useful when scouting for giving oneself waypoints. Pilots in space are limited to viewing the sector they are flying in.
The command view is covered in greater detail in a later lesson.
F4 - Ship loadout (when docked)
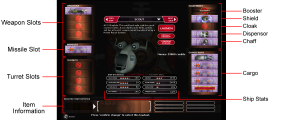
The ship loadout screen allows you to choose every item that your ship will carry upon launch.
Each items serves a different purpose and you can only carry few of them, so choosing wisely is central for a competent pilot. First select the ship you wish to fly by clicking on the ship list, then select what to load in each slot by clicking on the relevant space. Hover your mouse over any item for more information at the bottom of the screen.
The ship loadout view is further explained in a later lesson.
F4 - Inventory (when flying)
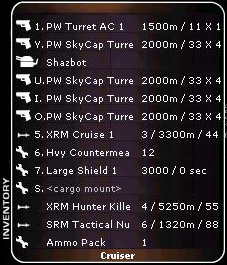
The inventory displays all the items contained in your cargo, as well as vital information about each.
For example, name, range and damage for your weapons, turrets and missiles are displayed, as well as the names of your turret gunners (only Shazbot is a gunner here); strength and time to full reactivation is shown for shields; counters are shown for all relevant items (e.g., you have 1 ammo pack). "<cargo mount>" means you have empty space in your cargo. Finally, the name of the ship is displayed at the bottom of this pane.
Ctrl-number cycles a slot between the available configurations; Shift-s cycles through the cargo; Ctrl-s jettisons the item marked with 'S'.
Managing your cargo covers more information about this topic.
F5 - Investments
This pane details what tech is researched, what tech or drones have been purchased and what tech or drones are available for purchase.
The 'Construction' menu of this window will let you quickly know how many stations of each type you have, what constructors are out, and how many miners you have. The other menus each concern a particular type of technology station, showing which developments have been completed, their cost, the research time, etc..
Pilots frequently check it to verify what technology they have, what new technology is about to be unlocked, what constructors are preparing for launch, etc. The commander uses this menu to invest money to buy station constructors, miners, technology, new weapons and missiles, etc.
F6 - Team Information
This window displays all players that are currently in the game.
You see each team's faction, the number of players in each team, each player's name, their wing assignment, the amount of cash they have, the sector and ship in which they are flying, etc. A smaller version is available by using the small white arrow at the top right of the view, or just by pressing Shift-F6.
Use this to see how much money the commander has, where you teammates are, what ship are they using, what wing are they in, what is their current order (especially useful for drones), where your miners and constructors are. For enemy teams, a subset of this information is displayed: who and what drones are known for enemy teams and where they have been last seen in what ship. A list of players not on a team is also available.
F7 - Minimap
The minimap is absolutely central to your situational awareness and you need it displayed at all times. This pane is crammed with information: it indicates the location of the different sectors and how they are interconnected by alephs. It indicates the sector you are in and sector you are going to; the sectors to which you can teleport (a.k.a. "ripcord"); the sectors on which cons can build; sector names; what is going on in that sector; what is in each sector for each team in what numbers; amount of tech and helium rocks; resources Helium3; etc.
Small icons at the top of the window show each ship and station within that sector. Sectors where enemy ships are located start flashing in a particular way, depending on the amount of danger. The color of a sector indicates its ownership. A pilot can interact with this map to engage his/her autopilot toward a certain sector, to send private messages to all teammates within a certain sector, or to give orders to the team about a sector.
This pane is so useful that it will be covered in two lessons.
F8 - Station Transfer Point
This window displays all stations to which you can go and all docked ships that you can board.
Simply double-click the station or ship you want to transfer to. You need this view to quickly move between your team's stations for attack or defense, and to board the turret of a docked ship.
The easiest way to use it is to press F8 to open the window, which automatically opens the minimap (F7). You can then click on the minimap to be transported directly into the station of that sector. This allows you to quickly jump to a station without having to find out the sector's name and select the corresponding station.
Tip: This is extremely useful when a sector is under attack: select the teleport view, click on the endangered sector in the minimap (which will be flashing) and confidently launch to defend. However, if there are multiple stations in a sector, using the minimap won't allow you to choose which station you will launch from. You will have to use the station list for times when you need to be precise.
| ← Hangar bay | Radar grid → |
