User:Cashto/Intro: Difference between revisions
No edit summary |
|||
| Line 5: | Line 5: | ||
== Goal of the Game == | == Goal of the Game == | ||
The purpose of the game is simple: destroy all enemy bases. To accomplish this, you must first gain map control with your own bases, as well as research superior weapons and technology to overwhelm the enemy. Both of these tasks require money, which is generated by special non-player ships called "miners" which retrieve a resource called "Helium 3" (or He3) from asteroids. Much of the game revolves around finding enemy miners and destroying them before they can safely dock the He3 cargo at a home base -- while at the same time protecting your own team's miners. | |||
Each team is lead by a veteran pilot called "the commander". The commander receives all the money in the game, and is in charge of buying bases and technology as well as coordinating the team around specific objectives. Most ships in the game are free, but some of the more important ones are not. To fly these ships you must request money from the commander, and he may deny that request if, for example, he is saving for something else, or doesn't believe you will be able to effectively use that ship. For the first few weeks, you should stick to flying free ships. | Each team is lead by a veteran pilot called "the commander". The commander receives all the money in the game, and is in charge of buying bases and technology as well as coordinating the team around specific objectives. Most ships in the game are free, but some of the more important ones are not. To fly these ships you must request money from the commander, and he may deny that request if, for example, he is saving for something else, or doesn't believe you will be able to effectively use that ship. For the first few weeks, you should stick to flying free ships. | ||
A game typically lasts 30 minutes to an hour. | |||
== Your First Ship: The Scout == | == Your First Ship: The Scout == | ||
The scout is an excellent beginner ship. Scouts are very fast ships and unlike most ships, scouts have excellent sensors which generally enable you to see most everything within a sector (except for stealth ships). They | The scout is an excellent beginner ship. Scouts are very fast ships and unlike most ships, scouts have excellent sensors which generally enable you to see most everything within a sector (except for stealth ships). They don't stand up very well in a dogfight -- but that's okay: it takes a while to learn good dogfighting skills in Allegiance, so as a new player you should generally try to avoid conflicts. | ||
So you've just joined a team. Hit F4 to go to the loadout menu. You have a choice of ships here. Pick the scout. Hit the launch button and away you go! | So you've just joined a team. Hit {{k|F4}} to go to the loadout menu. You have a choice of ships here. Pick the scout. Hit the launch button and away you go! | ||
''Basic controls:'' | |||
* Switch to mouse control: {{k|Num Pad 0}} | |||
* More thrust: {{k|+}} | |||
* Less thrust: {{k|-}} | |||
* 100% thrust: {{k|/}} | |||
* 0% thrust: {{k|Backspace}} | |||
== The Minimap == | == The Minimap == | ||
At the bottom left should be a little map. If it is not there, hit F7 to bring it up. It looks like this: | At the bottom left should be a little map. If it is not there, hit {{k|F7}} to bring it up. It looks like this: | ||
[[Image:Minimap.jpg]] | [[Image:Minimap.jpg]] | ||
This is a map of the game universe. Maps generally contain 12-16 sectors connected by wormholes called "alephs". Teams start at opposite ends of the map, and at the beginning of the game they can only see their own sector and immediately adjacent sectors. But alephs are usually arranged in a regular pattern, and there are only a dozen or so maps in common use, so this happens quite quickly. | This is a map of the game universe. Maps generally contain 12-16 sectors connected by wormholes called "alephs". Teams start at opposite ends of the map, and at the beginning of the game they can only see their own sector and immediately adjacent sectors. But alephs are usually arranged in a regular pattern, and there are only a dozen or so maps in common use, so this happens quite quickly. | ||
There are | There are [[Cadet I/Minimap icons|lots of symbols]] that can appear on the minimap. Here are a few of the most important ones: | ||
* Base: [[Image:Dn hsgarbmp.PNG]] [[Image:Dn hsoutbmp.PNG]] | * Base: [[Image:Dn hsgarbmp.PNG]] [[Image:Dn hsoutbmp.PNG]] | ||
* Teleport receiver (a.k.a., "ripcord"): [[Image:Apb tp std.jpg]] | * Teleport receiver (a.k.a., "ripcord"): [[Image:Apb tp std.jpg]] | ||
* Constructor (a non-player ship that builds a base on an asteroid): [[Image:Dn hicsmbmp.png]] [[Image:Dn | * Constructor (a non-player ship that builds a base on an asteroid): [[Image:Dn hicsmbmp.png]] [[Image:Dn hicsmenhbmp.png]] [[Image:Dn hicsmadvbmp.png]] | ||
* Miner: [[Image:Dn himnrbmp.png]] | * Miner: [[Image:Dn himnrbmp.png]] | ||
* Bomber: [[Image:Dn hibmbbmp.PNG]] | * Bomber: [[Image:Dn hibmbbmp.PNG]] | ||
* Eject pod (stranded pilot): [[Image:Ap lifepod.jpg]] | |||
== How to Probe == | == How to Probe == | ||
One way to immediately be useful to your team is to drop probes from your scout. Without probes, you won't know what's going on in enemy-held or neutral sectors. The enemy will be able to build bases, mine freely, and amass giant bomb runs without your team's knowledge. "Probing wins games". | |||
In the F4 screen, locate the cargo area: | |||
[[Image:800px-LoadoutScreen.png]] | |||
Fill ''all'' slots with probes: | |||
[[Image:Probe item.PNG]] | |||
Launch | |||
{{Tip|* Always drop probes in enemy or neutral sectors. You don't need probes to see what's going on in friendly sectors -- your bases do that job well enough for you already. | |||
* Put probes next to high traffic areas: alephs and helium asteriods especially. | |||
* Probes have a limited detection range -- about 900m or so. But they aren't invisible, and they are easy to destroy, so to avoid detection you should place them about 900m from the target. | |||
* Scouting is a high-mortality mission. If you see an enemy closing in on you, your best bet is to ripcord (teleport) out. Do this by clicking on the minimap on a sector that contains a teleport receiver. | |||
* Don't stray too far from home! If you do get podded, it may be a long slow walk home.}} | |||
== How to Repair Ships == | == How to Repair Ships == | ||
== How to Pick up Tech and Cashboxes == | == How to Pick up Tech and Cashboxes == | ||
== What's Next == | == What's Next == | ||
Revision as of 03:34, 13 December 2009
Welcome to the best game you never played!
Joining a Team
Goal of the Game
The purpose of the game is simple: destroy all enemy bases. To accomplish this, you must first gain map control with your own bases, as well as research superior weapons and technology to overwhelm the enemy. Both of these tasks require money, which is generated by special non-player ships called "miners" which retrieve a resource called "Helium 3" (or He3) from asteroids. Much of the game revolves around finding enemy miners and destroying them before they can safely dock the He3 cargo at a home base -- while at the same time protecting your own team's miners.
Each team is lead by a veteran pilot called "the commander". The commander receives all the money in the game, and is in charge of buying bases and technology as well as coordinating the team around specific objectives. Most ships in the game are free, but some of the more important ones are not. To fly these ships you must request money from the commander, and he may deny that request if, for example, he is saving for something else, or doesn't believe you will be able to effectively use that ship. For the first few weeks, you should stick to flying free ships.
A game typically lasts 30 minutes to an hour.
Your First Ship: The Scout
The scout is an excellent beginner ship. Scouts are very fast ships and unlike most ships, scouts have excellent sensors which generally enable you to see most everything within a sector (except for stealth ships). They don't stand up very well in a dogfight -- but that's okay: it takes a while to learn good dogfighting skills in Allegiance, so as a new player you should generally try to avoid conflicts.
So you've just joined a team. Hit F4 to go to the loadout menu. You have a choice of ships here. Pick the scout. Hit the launch button and away you go!
Basic controls:
- Switch to mouse control: Num Pad 0
- More thrust: +
- Less thrust: -
- 100% thrust: /
- 0% thrust: Backspace
The Minimap
At the bottom left should be a little map. If it is not there, hit F7 to bring it up. It looks like this:
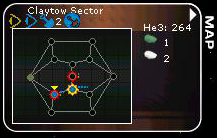

This is a map of the game universe. Maps generally contain 12-16 sectors connected by wormholes called "alephs". Teams start at opposite ends of the map, and at the beginning of the game they can only see their own sector and immediately adjacent sectors. But alephs are usually arranged in a regular pattern, and there are only a dozen or so maps in common use, so this happens quite quickly.
There are lots of symbols that can appear on the minimap. Here are a few of the most important ones:
- Base:


- Teleport receiver (a.k.a., "ripcord"):

- Constructor (a non-player ship that builds a base on an asteroid):


- Miner:

- Bomber:

- Eject pod (stranded pilot):

How to Probe
One way to immediately be useful to your team is to drop probes from your scout. Without probes, you won't know what's going on in enemy-held or neutral sectors. The enemy will be able to build bases, mine freely, and amass giant bomb runs without your team's knowledge. "Probing wins games".
In the F4 screen, locate the cargo area:
Fill all slots with probes:
![]()
Launch

Tip: * Always drop probes in enemy or neutral sectors. You don't need probes to see what's going on in friendly sectors -- your bases do that job well enough for you already. - Put probes next to high traffic areas: alephs and helium asteriods especially.
- Probes have a limited detection range -- about 900m or so. But they aren't invisible, and they are easy to destroy, so to avoid detection you should place them about 900m from the target.
- Scouting is a high-mortality mission. If you see an enemy closing in on you, your best bet is to ripcord (teleport) out. Do this by clicking on the minimap on a sector that contains a teleport receiver.
- Don't stray too far from home! If you do get podded, it may be a long slow walk home.